1. 微服务介绍 1.1 系统架构演变
架构类型
优点
缺点
单体应用架构
1. 项目架构简单,小型项目的话, 开发成本低
1. 全部功能集成在一个工程中,对于大型项目来讲不易开发和维护
垂直应用架构
1. 系统拆分实现了流量分担,解决了并发问题,而且可以针对不同模块进行优化和水平扩展
1. 系统之间相互独立, 无法进行相互调用
分布式架构
抽取公共的功能为服务层,提高代码复用性
系统间耦合度变高,调用关系错综复杂,难以维护
SOA架构
使用注册中心解决了服务间调用关系的自动调节
1. 服务间会有依赖关系,一旦某个环节出错会影响较大( 服务雪崩 )
微服务架构
1. 服务原子化拆分,独立打包、部署和升级,保证每个微服务清晰的任务划分,利于扩展
分布式系统开发的技术成本高(容错、分布式事务等)
1.2 微服务架构的常见问题
这么多小服务,如何管理他们?(服务治理 注册中心[服务注册 发现 剔除])
这么多小服务,他们之间如何通讯?(restful rpc)
这么多小服务,客户端怎么访问他们?(网关)
这么多小服务,一旦出现问题了,应该如何自处理?(容错)
这么多小服务,一旦出现问题了,应该如何排错? (链路追踪)
1.3 微服务架构的常见概念 1.3.1 服务治理
服务治理就是进行服务的自动化管理,其核心是服务的自动注册与发现
1.3.2 服务调用 在微服务架构中,通常存在多个服务之间的远程调用的需求。目前主流的远程调用技术有基于 HTTP的RESTful接口以及基于TCP的RPC协议
REST (Representational State Transfer)
这是一种HTTP调用的格式,更标准,更通用,无论哪种语言都支持http协议
RPC (Remote Promote Call)
一种进程间通信方式。允许像调用本地服务一样调用远程服务。RPC框架的主要目标就是让远程服务调用更简单、透明。RPC框架负责屏蔽底层的传输方式、序列化方式和通信细节。开发人员在使用的时候只需要了解谁在什么位置提供了什么样的远程服务接口即可,并不需要关心底层通信细节和调用过程。
区别与联系
比较项
RESTful
RPC
通讯协议
HTTP
一般使用TCP
性能
略低
较高
灵活度
高
低
应用
微服务框架
SOA架构
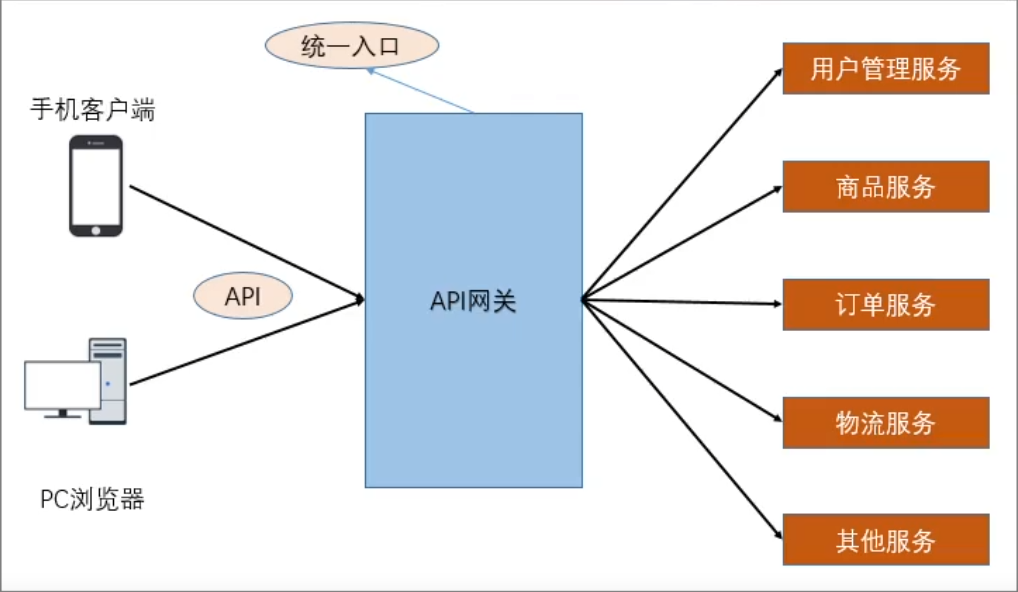
1.3.3 服务网关 随着微服务的不断增多,不同的微服务一般会有不同的网络地址,而外部客户端可能需要调用多个服务的接口才能完成一个业务需求,如果让客户端直接与各个微服务通信可能出现:
客户端需要调用不同的url地址,增加难度
在一定的场景下,存在跨域请求的问题
每个微服务都需要进行单独的身份认证
针对这些问题,API网关顺势而生。
API网关直面意思是将所有API调用统一接入到API网关层,由网关层统一接入和输出。一个网关的 基本功能有:统一接入、安全防护、协议适配、流量管控、长短链接支持、容错能力。有了网关之后, 各个API服务提供团队可以专注于自己的的业务逻辑处理,而API网关更专注于安全、流量、路由等问题。
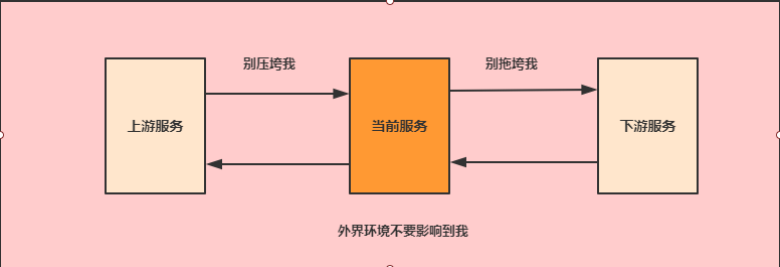
1.3.4 服务容错 在微服务当中,一个请求经常会涉及到调用几个服务,如果其中某个服务不可用,没有做服务容错的话,极有可能会造成一连串的服务不可用,这就是雪崩效应。
我们没法预防雪崩效应的发生,只能尽可能去做好容错。
服务容错的三个核心思想是
不被外界环境影响
不被上游请求压垮
不被下游响应拖垮
1.3.5 链路追踪 随着微服务架构的流行,服务按照不同的维度进行拆分,一次请求往往需要涉及到多个服务。互联网应用构建在不同的软件模块集上,这些软件模块,有可能是由不同的团队开发、可能使用不同的编程语言来实现、有可能布在了几千台服务器,横跨多个不同的数据中心。因此,就需要对一次请求涉及的多个服务链路进行日志记录,**性能监控即链路追踪**
1.4 微服务架构的常见解决方案 1.4.1 ServiceComb Apache ServiceComb,前身是华为云的微服务引擎 CSE (Cloud Service Engine) 云服务,是全球首个Apache微服务顶级项目。它提供了一站式的微服务开源解决方案,致力于帮助企业、用户和开发者将企业应用轻松微服务化上云,并实现对微服务应用的高效运维管理。
1.4.2 SpringCloud Spring Cloud是一系列框架的集合。它利用Spring Boot的开发便利性巧妙地简化了分布式系统基础设施的开发,如服务发现注册、配置中心、消息总线、负载均衡、断路器、数据监控等,都可以用Spring Boot的开发风格做到一键启动和部署。
Spring Cloud并没有重复制造轮子,它只是将目前各家公司开发的比较成熟、经得起实际考验的服务框架组合起来,通过Spring Boot风格进行再封装屏蔽掉了复杂的配置和实现原理,最终给开发者留出了一套简单易懂、易部署和易维护的分布式系统开发工具包。
1.4.3 SpringCloud Alibaba Spring Cloud Alibaba 致力于提供微服务开发的一站式解决方案。此项目包含开发分布式应用微服务的必需组件,方便开发者通过 Spring Cloud 编程模型轻松使用这些组件来开发分布式应用服务。
2. SpringCloud Alibaba介绍 Spring Cloud Alibaba 致力于提供微服务开发的一站式解决方案。此项目包含开发分布式应用微服务的必需组件,方便开发者通过 Spring Cloud 编程模型轻松使用这些组件来开发分布式应用服务。
依托 Spring Cloud Alibaba,您只需要添加一些注解和少量配置,就可以将 Spring Cloud 应用接入阿里微服务解决方案,通过阿里中间件来迅速搭建分布式应用系统。
2.1 主要功能
服务限流降级 :默认支持 WebServlet、WebFlux, OpenFeign、RestTemplate、Spring Cloud Gateway, Zuul, Dubbo 和 RocketMQ 限流降级功能的接入,可以在运行时通过控制台实时修 改限流降级规则,还支持查看限流降级 Metrics 监控。
服务注册与发现 :适配 Spring Cloud 服务注册与发现标准,默认集成了 Ribbon 的支持。
分布式配置管理 :支持分布式系统中的外部化配置,配置更改时自动刷新。
消息驱动能力 :基于 Spring Cloud Stream 为微服务应用构建消息驱动能力。
分布式事务 :使用 @GlobalTransactional 注解, 高效并且对业务零侵入地解决分布式事务问题。
阿里云对象存储 :阿里云提供的海量、安全、低成本、高可靠的云存储服务。支持在任何应用、任何时间、任何地点存储和访问任意类型的数据。
分布式任务调度 :提供秒级、精准、高可靠、高可用的定时(基于 Cron 表达式)任务调度服务。
同时提供分布式的任务执行模型,如网格任务。网格任务支持海量子任务均匀分配到所有 Worker(schedulerx-client)上执行。
阿里云短信服务 :覆盖全球的短信服务,友好、高效、智能的互联化通讯能力,帮助企业迅速搭建 客户触达通道。
2.2 组件
Sentinel :把流量作为切入点,从流量控制、熔断降级、系统负载保护等多个维度保护服务的稳定性Nacos :一个更易于构建云原生应用的动态服务发现、配置管理和服务管理平台。RocketMQ :一款开源的分布式消息系统,基于高可用分布式集群技术,提供低延时的、高可靠 的消息发布与订阅服务。Dubbo :Apache Dubbo™ 是一款高性能 Java RPC 框架。Seata :阿里巴巴开源产品,一个易于使用的高性能微服务分布式事务解决方案。Alibaba Cloud ACM :一款在分布式架构环境中对应用配置进行集中管理和推送的应用配置中心 产品Alibaba Cloud OSS : 阿里云对象存储服务(Object Storage Service,简称 OSS),是阿里云提 供的海量、安全、低成本、高可靠的云存储服务。您可以在任何应用、任何时间、任何地点存储和 访问任意类型的数据Alibaba Cloud SchedulerX: 阿里中间件团队开发的一款分布式任务调度产品,提供秒级、精 准、高可靠、高可用的定时(基于 Cron 表达式)任务调度服务。 Alibaba Cloud SMS: 覆盖全球的短信服务,友好、高效、智能的互联化通讯能力,帮助企业迅速 搭建客户触达通道。
3. 案例准备 3.1 技术选型 maven:3.3.9
数据库:MySQL 5.7
持久层: SpingData Jpa
其他: SpringCloud Alibaba 技术栈
3.2 模块设计 springcloud-alibaba 父工程
shop-common 公共模块【实体类】
shop-user 用户微服务 【端口: 807x】
shop-product 商品微服务 【端口: 808x】
shop-order 订单微服务 【端口: 809x】
3.3 创建父工程
springcloud-alibaba 父工程
1
2
3
4
5
6
7
8
9
10
11
12
13
14
15
16
17
18
19
20
21
22
23
24
25
26
27
28
29
30
31
32
33
34
35
36
37
38
39
40
41
42
43
<?xml version="1.0" encoding="UTF-8"?> <project xmlns ="http://maven.apache.org/POM/4.0.0" xmlns:xsi ="http://www.w3.org/2001/XMLSchema-instance" xsi:schemaLocation ="http://maven.apache.org/POM/4.0.0 http://maven.apache.org/xsd/maven-4.0.0.xsd" > <modelVersion > 4.0.0</modelVersion > <groupId > cn.jyw</groupId > <artifactId > shop-parent</artifactId > <version > 1.0-SNAPSHOT</version > <packaging > pom</packaging > <parent > <groupId > org.springframework.boot</groupId > <artifactId > spring-boot-starter-parent</artifactId > <version > 2.1.3.RELEASE</version > </parent > <properties > <java.version > 1.8</java.version > <project.build.sourceEncoding > UTF-8</project.build.sourceEncoding > <project.reporting.outputEncoding > UTF- 8</project.reporting.outputEncoding > <spring-cloud.version > Greenwich.RELEASE</spring-cloud.version > <spring-cloud-alibaba.version > 2.1.0.RELEASE</spring-cloud-alibaba.version > </properties > <dependencyManagement > <dependencies > <dependency > <groupId > org.springframework.cloud</groupId > <artifactId > spring-cloud-dependencies</artifactId > <version > ${spring-cloud.version}</version > <type > pom</type > <scope > import</scope > </dependency > <dependency > <groupId > com.alibaba.cloud</groupId > <artifactId > spring-cloud-alibaba-dependencies</artifactId > <version > ${spring-cloud-alibaba.version}</version > <type > pom</type > <scope > import</scope > </dependency > </dependencies > </dependencyManagement > </project >
3.4 创建基础模块
shop-common 公共模块【实体类】
1
2
3
4
5
6
7
8
9
10
11
12
13
14
15
16
17
18
19
20
21
22
23
24
25
26
27
28
29
30
31
32
33
34
35
36
37
38
39
<?xml version="1.0" encoding="UTF-8"?> <project xmlns ="http://maven.apache.org/POM/4.0.0" xmlns:xsi ="http://www.w3.org/2001/XMLSchema-instance" xsi:schemaLocation ="http://maven.apache.org/POM/4.0.0 http://maven.apache.org/xsd/maven-4.0.0.xsd" > <parent > <artifactId > shop-parent</artifactId > <groupId > cn.jyw</groupId > <version > 1.0-SNAPSHOT</version > </parent > <modelVersion > 4.0.0</modelVersion > <artifactId > shop-common</artifactId > <properties > <maven.compiler.source > 8</maven.compiler.source > <maven.compiler.target > 8</maven.compiler.target > </properties > <dependencies > <dependency > <groupId > org.springframework.boot</groupId > <artifactId > spring-boot-starter-data-jpa</artifactId > </dependency > <dependency > <groupId > org.projectlombok</groupId > <artifactId > lombok</artifactId > </dependency > <dependency > <groupId > com.alibaba</groupId > <artifactId > fastjson</artifactId > <version > 1.2.56</version > </dependency > <dependency > <groupId > mysql</groupId > <artifactId > mysql-connector-java</artifactId > <version > 5.1.6</version > </dependency > </dependencies > </project >
实体类
注意:本次使用jpa自动创建数据库,需要将实体包放在SpringBoot启动类之下,使带有@Entity的类被扫描。否则需要指定扫描实体包
1 2 3 4 5 6 7 8 9 10 11 @Entity(name = "shop_user") @Data public class User { @Id @GeneratedValue(strategy = GenerationType.IDENTITY) private Integer uid; private String username; private String password; private String telephone; }
1 2 3 4 5 6 7 8 9 10 11 @Entity(name = "shop_product") @Data public class Product { @Id @GeneratedValue(strategy = GenerationType.IDENTITY) private Integer pid; private String pname; private Double pprice; private Integer stock; }
1 2 3 4 5 6 7 8 9 10 11 12 13 14 @Entity(name = "shop_order") @Data public class Order { @Id @GeneratedValue(strategy = GenerationType.IDENTITY) private Long oid; private Integer uid; private String username; private Integer pid; private String pname; private Double pprice; private Integer number; }
4. 创建微服务
步骤:
创建模块 导入依赖
创建SpringBoot主类
加入配置文件
创建必要的接口和实现类(controller service dao)
4.1 用户微服务
导入依赖
1
2
3
4
5
6
7
8
9
10
11
12
13
14
15
16
17
18
19
20
21
22
23
24
25
26
27
28
29
<?xml version="1.0" encoding="UTF-8"?> <project xmlns ="http://maven.apache.org/POM/4.0.0" xmlns:xsi ="http://www.w3.org/2001/XMLSchema-instance" xsi:schemaLocation ="http://maven.apache.org/POM/4.0.0 http://maven.apache.org/xsd/maven-4.0.0.xsd" > <parent > <artifactId > shop-parent</artifactId > <groupId > cn.jyw</groupId > <version > 1.0-SNAPSHOT</version > </parent > <modelVersion > 4.0.0</modelVersion > <artifactId > shop-user</artifactId > <properties > <maven.compiler.source > 8</maven.compiler.source > <maven.compiler.target > 8</maven.compiler.target > </properties > <dependencies > <dependency > <groupId > cn.jyw</groupId > <artifactId > shop-common</artifactId > <version > 1.0-SNAPSHOT</version > </dependency > <dependency > <groupId > org.springframework.boot</groupId > <artifactId > spring-boot-starter-web</artifactId > </dependency > </dependencies > </project >
创建SpringBoot主类
1
2
3
4
5
6
@SpringBootApplication public class UserApplication { public static void main (String[] args) { SpringApplication.run(UserApplication.class); } }
加入配置文件 application.yml
1
2
3
4
5
6
7
8
9
10
11
12
13
14
15
16
server: port: 8071 spring: application: name: service-user datasource: driver-class-name: com.mysql.cj.jdbc.Driver url: jdbc:mysql:///shop?serverTimezone=UTC&useUnicode=true&c3haracterEncoding=utf-8&useSSL=true username: root password: root jpa: properties: hibernate: hbm2ddl: auto: update dialect: org.hibernate.dialect.MySQL5InnoDBDialect
4.2 商品微服务
导入依赖
1
2
3
4
5
6
7
8
9
10
11
12
13
14
15
16
17
18
19
20
21
22
23
24
25
26
27
28
29
30
31
32
33
34
35
36
37
38
<?xml version="1.0" encoding="UTF-8"?> <project xmlns ="http://maven.apache.org/POM/4.0.0" xmlns:xsi ="http://www.w3.org/2001/XMLSchema-instance" xsi:schemaLocation ="http://maven.apache.org/POM/4.0.0 http://maven.apache.org/xsd/maven-4.0.0.xsd" > <parent > <artifactId > shop-parent</artifactId > <groupId > cn.jyw</groupId > <version > 1.0-SNAPSHOT</version > </parent > <modelVersion > 4.0.0</modelVersion > <artifactId > shop-product</artifactId > <properties > <maven.compiler.source > 8</maven.compiler.source > <maven.compiler.target > 8</maven.compiler.target > </properties > <dependencies > <dependency > <groupId > cn.jyw</groupId > <artifactId > shop-common</artifactId > <version > 1.0-SNAPSHOT</version > </dependency > <dependency > <groupId > org.springframework.boot</groupId > <artifactId > spring-boot-starter-web</artifactId > </dependency > <dependency > <groupId > org.springframework.boot</groupId > <artifactId > spring-boot-starter-test</artifactId > </dependency > <dependency > <groupId > junit</groupId > <artifactId > junit</artifactId > <scope > test</scope > </dependency > </dependencies > </project >
创建SpringBoot主类
1
2
3
4
5
6
@SpringBootApplication public class ProductApplication { public static void main (String[] args) { SpringApplication.run(ProductApplication.class,args); } }
加入配置文件 application.yml
1
2
3
4
5
6
7
8
9
10
11
12
13
14
15
16
server: port: 8081 spring: application: name: service-product datasource: driver-class-name: com.mysql.cj.jdbc.Driver url: jdbc:mysql:///shop?serverTimezone=UTC&useUnicode=true&characterEncoding=utf-8&useSSL=true username: root password: root jpa: properties: hibernate: hbm2ddl: auto: update dialect: org.hibernate.dialect.MySQL5InnoDBDialect
创建ProductDao接口
1
2
public interface ProductDao extends JpaRepository <Product,Integer> {}
创建ProductService接口和实现类
1
2
3
4
5
6
7
8
9
10
@Service public class ProductServiceImpl implements ProductService { @Autowired private ProductDao productDao; @Override public Product findByPid (Integer pid) { return productDao.findById(pid).get(); } }
创建Controller
1
2
3
4
5
6
7
8
9
10
11
12
13
14
@RestController @Slf4j public class ProductController { @Autowired private ProductService productService; @GetMapping("/product/{pid}") public Product findByPid (@PathVariable Integer pid) { Product product = productService.findByPid(pid); log.info("查询结果:" + JSON.toJSONString(product)); return product; } }
启动工程,等到数据库表创建完毕之后,加入测试数据
1
2
3
4
INSERT INTO shop_product VALUE(NULL,'小米','1000','5000'); INSERT INTO shop_product VALUE(NULL,'华为','2000','5000'); INSERT INTO shop_product VALUE(NULL,'苹果','3000','5000'); INSERT INTO shop_product VALUE(NULL,'OPPO','4000','5000');
最后通过浏览器访问服务即可
4.3 订单微服务
导入依赖
1
2
3
4
5
6
7
8
9
10
11
12
13
14
15
16
17
18
19
20
21
22
23
24
25
26
27
28
29
30
31
32
33
34
35
36
37
38
39
<?xml version="1.0" encoding="UTF-8"?> <project xmlns ="http://maven.apache.org/POM/4.0.0" xmlns:xsi ="http://www.w3.org/2001/XMLSchema-instance" xsi:schemaLocation ="http://maven.apache.org/POM/4.0.0 http://maven.apache.org/xsd/maven-4.0.0.xsd" > <parent > <artifactId > shop-parent</artifactId > <groupId > cn.jyw</groupId > <version > 1.0-SNAPSHOT</version > </parent > <modelVersion > 4.0.0</modelVersion > <artifactId > shop-order</artifactId > <properties > <maven.compiler.source > 8</maven.compiler.source > <maven.compiler.target > 8</maven.compiler.target > </properties > <dependencies > <dependency > <groupId > cn.jyw</groupId > <artifactId > shop-common</artifactId > <version > 1.0-SNAPSHOT</version > </dependency > <dependency > <groupId > org.springframework.boot</groupId > <artifactId > spring-boot-starter-web</artifactId > </dependency > <dependency > <groupId > org.springframework.boot</groupId > <artifactId > spring-boot-starter-test</artifactId > </dependency > <dependency > <groupId > junit</groupId > <artifactId > junit</artifactId > <scope > test</scope > </dependency > </dependencies > </project >
创建SpringBoot主类
1
2
3
4
5
6
@SpringBootApplication public class OrderApplication { public static void main(String[] args) { SpringApplication.run(OrderApplication.class,args); } }
加入配置文件 application.yml
1
2
3
4
5
6
7
8
9
10
11
12
13
14
15
16
17
server: port: 8091 spring: application: name: service-order datasource: driver-class-name: com.mysql.cj.jdbc.Driver url: jdbc:mysql:///shop?serverTimezone=UTC&useUnicode=true&characterEncoding=utf-8&useSSL=true username: root password: root jpa: properties: hibernate: hbm2ddl: auto: update dialect: org.hibernate.dialect.MySQL5InnoDBDialect
创建OrderDao接口
1
2
public interface OrderDao extends JpaRepository <Order,Long> {}
创建OrderService接口和实现类
1
2
3
4
5
6
7
8
9
10
@Service public class OrderServiceImpl implements OrderService { @Autowired private OrderDao orderDao; @Override public void save (Order order) { orderDao.save(order); } }
创建RestTemplate 调用服务模板
1
2
3
4
5
6
7
8
9
10
11
@SpringBootApplication public class OrderApplication { public static void main (String[] args) { SpringApplication.run(OrderApplication.class,args); } @Bean @LoadBalanced public RestTemplate getRestTemplate () { return new RestTemplate (); } }
创建Controller
1
2
3
4
5
6
7
8
9
10
11
12
13
14
15
16
17
18
19
20
21
22
23
24
25
26
27
28
29
30
@RestController @Slf4j public class OrderController { @RequestMapping("/order/prod/{pid}") public Order order (@PathVariable("pid") Integer pid) { log.info("接收到{}号商品的下单请求,接下来调用商品微服务查询此商品信息" , pid); Product product = restTemplate.getForObject("http://localhost:8081/product/" + pid, Product.class); log.info("查询到{}号商品的信息,内容是:{}" , pid, JSON.toJSONString(product)); Order order = new Order (); order.setUid(1 ); order.setUsername("测试用户" ); order.setPid(pid); order.setPname(product.getPname()); order.setPprice(product.getPprice()); order.setNumber(1 ); orderService.save(order); log.info("创建订单成功,订单信息为{}" , JSON.toJSONString(order)); return order; } }
最后启动工程,通过浏览器访问服务进行测试
 微信
微信 支付宝
支付宝